Las Vegas Yard Crashers!
This will air in April of 2010!
Here is a preview

This is what was done on the first day. I showed up on the beginning of the second and the final day. It's amazing what can take place in just 12 hours!

Above the pavers were installed the day before.
Below is the patio with the outdoor kitchen set aside for now.


Above is where the outdoor kitchen will reside later.
Even the palm trees were brought in! There was nothing on the site when it started the day before.

Below Ahmed was leveling the ground around the fire pit area. Ahmed worked all day, much harder than anyone else! I was very impressed how hard he actually works to get the show done.


Below is where the propane fire pit will sit. The controller will be mounted to the side of the concrete base after the paper tubes are cut away.


Above and below you can see the inside of the planter is coated to prevent water from leaching out.

Above you can see on the ground that we brought the fire bowl in. Just so you know it was about 300 lbs!


Above and below you can see outdoor kitchen. The trough coming out is actually water fall spilling into a dry creek bed below. The water feature was covered with a glass top making it a dining area as well. On the inner wedges they wrapped rope lights to accent the water and rocks under the glass top.


Above and below you can see the sand was installed as a base for the artificial grass to come.


Above they are compacting the sand for the grass to be installed.
Below Ahmed is finishing the dry creek bed.

Below the grass is installed.

Below the dry creek bed is finished and the grass is now installed in the back are as well.


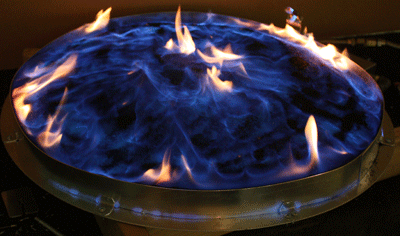
Above is our fire bowl on propane. We used Starfire base glass with Ice and Diamonds on top. We brought out several colors of diamonds for the customer to pick and choose bur she liked them all so much, she installed every last one!

Below you can see after everything was cleaned up how spectacular it turned out!


We are to feature several more episodes with Yard Crashers and we will be showing several more of our new product lines on their shows. We still have several shows we need to post pictures of what we did. Please come back from time to time to see our latest updates.
I thank Ahmed and the producers of the Yard Crashers for giving us the opportunity to work with them.
Thanks to Tiffany, Krystal and Holly at the Idea Factory!
Idea Factory produces Yard Crashers for the DIY Network
"Click HERE for the DIY Network/ Yard Crashers Site!"
The fire pit below was built by Mark Showalter in Washington state.
He used:
Gray and Gray Reflective base glass,
Gray Pyrite,
Copper Ruby Red Topper,
and Black base glass mixed in.
This is the stone pot with the bottom up.


They drilled for the trimming valve to be installed.


A picture is worth a thousand words, and here you have it.

The fireplace below belongs to Todd. As you are going to see one great before and after transformation.
He used an 1/8" Clear base with Starfire on top. Then he added Red R Topper, Black Luster Topper and a few Clear Diamonds.


Out with the old and in with the new!


We would of liked more pictures of it burning but Oh Well!

The fireplace below is from Cory here locally in
Rancho Cucamonga California. This transformation was a complete surface make over along with out Sterling Silver interior. The glass that was used was Bronze base glass. This is truly a DIY project and we like to help you create your ideas to reality.
Here we begin with the old interior brick panels removed.
Below you can see the new stone being applied.
Below the Sterling Silver panels and Bronze base glass with a few pounds of Gold base glass was installed.
Now you can see the reflection on the walls in the Sterling Silver panels. No, these are not just mirrors in the fireplace. If you do try this, let us know how it worked out for you. Be sure to send us pictures of your project and we will be sure to post it on our "How Not To Do It Page"! No, Really!
Again we are proud to constantly give you new and exciting products for your fireplace and fire pit projects.

The fire pit below (from Randy Cox) has a Clear base with Pale Cobalt Blue Topper and Aquamarine Topper for a simple but very nice fire pit.

Below you can see the larger 3/4"/ 1" crushed lava rock as a base filler.


Below you can now see our 1/4" crushed lava to finish off the larger lava.


The glass goes in and your finished!.

Randy installed a 22" stainless ring and when he took the picture he had the flame on low.


Below is a collection we took pictures for our customer to decide on which base to use under the Amber Diamonds.
Amber Diamonds alone

Amber Diamonds on Black

Amber Diamonds on Starfire

Amber Diamonds on New Yellow

Amber Diamonds on Bronze

The same product can be displayed thousands of ways. What do you want to see? Our diamonds are made with a convex base so when you look at the Diamonds in the fire they seem to be melting on the inside, like looking into a spoon. We cause it to reflect backwards. Visit out "Diamonds Page" to see many more colors!
The fire pit below belongs to Chad Haupert. He used an Azurlite base with Azurlite Reflective on top. Then he created a star in the center using Bronze Rust Copper with and outline of Ice Ice Ice. We didn't get pictures of the complete pit nor of it burning. But it looks great!


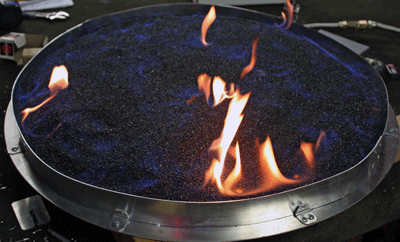
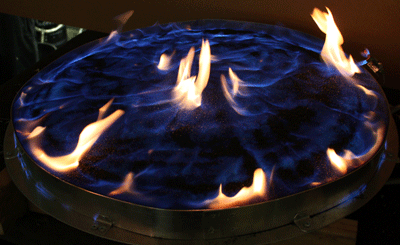
The burner below is one of our FPPK's (fire pit propane kit). With this FPPK we set it up for Black Magic! This was table tested for the pictures. Hopefully the customer will send us pictures after and during installation. We first sent these pictures for the customers approval. Here you go! The pan below belongs to Scott Spector and he finally installed the fire pit in his back yard, WOW, one really nice backyard!
This is one of our propane pan burner with slight modifications.
As you can see around the lower edges it was leaking and yes we did fix this.
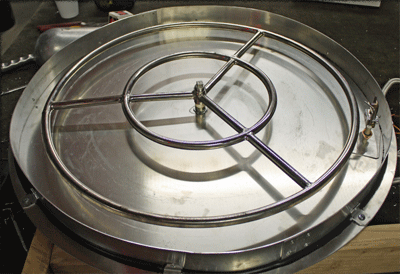
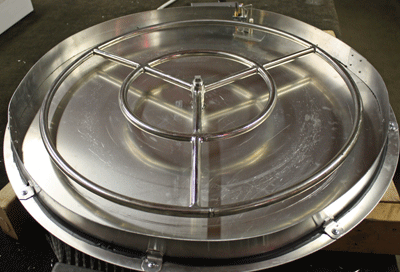
The fire pit below was built by Scott Spector in Florida. He started with an FPPK 30 which includes a 30" base plate and a double 24" stainless steel ring. Here we go from the beginning:

The propane line was run/ installed under the pavers.


The colors that were used are
1/2" Clear base,
Black Magic in the center,
Clear Diamonds,
Cobalt Blue Topper,
Clear Topper,
Cobalt Blue Light Topper
and our FPPK 30". That is our 30" propane burner. You can see the actual burner above burning before shipment and installation.

We don't have any pictures of the fire pit burning at Scott's but he did tel us that when he fired it up again he would try to send us a few pictures. Thanks Scott.

The fire table below was built by Christina "Stina" in the San Francisco area. With a little ambition, imagination and our help, she now has one very nice fire table.

Here is where it started. She made a template of the pan and where the mounting tabs would be located. Then we built the aluminum pan and propane burner for Stina to install.

Below is how the teak table started. We just brought it into the future.


Below the pan was installed with Galaxy Green base glass.


Below you can see the top installed and what a difference.

Below is her wonderfully finished project, Great job Stina!

The fireplace below is a self install in Palm Springs at Tim Rockwood's. About 2" of crushed lava was used and a 2" layer of Solex base glass was installed over a double 18" burner. Watch how simple this really is. From ugly to one really nice fireplace.

Above and below is what it looked like when the project was started.


Below you can see the grate (noting great here) and the remote control. Too much stuff in the fireplace if you ask me.


Above, if you use a remote control, let's find a better way of hiding it? You think?
Below all of the STUFF is removed, much better!


Above and below it is now painted and the double 18" burner is installed.
Very clean look! Uncluttered!


Above the lava was poured up to the gas stub on the left side just enough to cover the burner. Be sure to leave 3 to 4" in the front for the glass. You don't want the lava all the way up front.

Now pour the glass and you have a heat producing fireplace as you were supposed to have in the beginning and it looks pretty good too!


These pictures of the fireplace were taken in the daytime if you were thinking why they were so light.

The fire pit below is going to be installed in Sacramento on 11 14 09 for the Yard Crashers/ DIY/ HGTV show. After it is and has been installed we will post pictures on the Yard Crashers page. In the mean time here is the how to and why. We can build any size, shape, design feature you desire. We build to your imagination.
Below is the catch basin to hold the water for the feature

Above you see the auto fill?
Below the water pump is now install below.

Below the top pan is in place for testing with the fire and water bowls in place


Below the stainless steel ring is installed.

Below the glass (Bronze base glass) has been installed and the lights turned on.
 .
.
Below you can see the pump has been turned on.

and now the fire.

We placed a card board template to replicate the table top to conceal the lights as well.

Now we add color to the water!


Here is the feature exposed with the blue water. You can change the water to any color you like.


This feature is only 6 1/2" tall. You can mount this under the table top and keep it only an inch or so above the surface of the table top.

So let's change it to red water and add Starfire base glass.


Remember, we build to your imagination!

The finished pictures will be posted on the Yard Crashers page when this project is installed after 11 14 09!
Do it yourself fireplace remodel made easy, or at least it seems that way.
First, the tile that was installed is not rated for fire. This tile would of popped off as soon as the fire was turned on. So do a little research before you begin. We can help in many ways, just call and ask.

It may have of seemed to be a good idea at the time, but it wasn't!

When redesigning a fireplace we suggest card board mache'. A card board mock up so you can see a basic preview of your project.


Below you can see the bottom, top and mantle in card board.


Now the rip and tear process begins!

Below we installed the extra electrical for the components and the TV. The components will be installed on the right side out of view with a black glass door. This will be installed later.

Below the framing begins.


Below we now added the Durock at the fireplace opening. This is key to the whole project. Math is very important when doing these layouts!


Below you can see the slate is being added.


Above and below the fireplace is 90% finished. The mantle needs to be installed and the door on the right to conceal the components needs to be installed as well. The inside of the fireplace will have 3 pieces of black galaxy granite installed. We will post these pictures of the fireplace when it is completely finished as well.

Now for the glass installation. We started with a satin black paint on the back walls, until we install the granite. Then we bulked up the base with 2" of white sand as this will save you a bunch of money! We used sand because we were pouring Starfire base glass in the fireplace. If we were to use a darker color of glass we would of used our crushed lava rock as a filler. When using sand, always make sure the burner is on top of the sand.

Test the burner/ location making sure the flames don't hit the walls.


Then pour the glass!


We added a few pink diamonds and then later added Ice Ice Ice and Clear Diamonds. These products because of the way they are made appear to be melting on the inside.


The sealer that was used was a stone enhancer, not just a regular cheap sealer. When using rock you always want to see the beauty of the stone you are using.


As you can see the mantle is still missing. We have a few more details to still do and as soon as we have time to post the pictures, they will be here.
We encourage imagination to all of our customers and we support you and your projects. Regardless how simple or how creative. This is one of the elements that spawned our success and continues to do so.
The Fire Table below was installed in Sacramento California by and for Yard Crashers. The finished pictures will be posted on the Yard Crashers page when this project is installed after 01 20 10. This episode was to be labeled "Outdoor Shower" on HGTV and the DIY Network but somehow it was labeled "Modern Fire Wall" go figure? It is episode 302 on HGTV or DIY Network. The details will be shown on the DIY page when and as soon as we receive them from the producers. We built a square aluminum pan with an 18" double stainless steel ring and used one of our FPPK kits for the propane fuel. This will be shown on the episode coverage as well. Here are the pictures of the back yard and the finished fire table using propane.


Kentucky Fireplace Remodel
The next fireplace was built by Dave Luerman in Kentucky and you will now see his before and after also using a base of Starfire base glass.
Below you can see where it all began. Dave is one very creative customer.
Luerman 1
The fireplace that was replaced was very nice but just met the needs of Dave.
Luerman 2
Out with the old and lets frame up the new.
Luerman 3
Luerman 4
Luerman 5
Add the durock panels.
Luerman 6
Luerman 7
Luerman 8
Frame the Hearth
Luerman 11
Luerman 10
Luerman 12
Install a triple 24" burner.
Luerman 13
Luerman 14
Luerman 15
Luerman 16
Luerman 17
Luerman 18
Add Starfire base glass and your done.
Luerman 19
The fireplace below is from Steve Calderon and he used a Starfire base glass with Gold and Bronze Rust Copper on top.
This is from beginning to end.

Above is the before believe it or not. As you can see Steve did a terrific job. This was a wood burning fireplace before. he installed a gas line and control valve on the right side.


Below you can see the old burner which we replaced with the new double 18" burner.


Mask it, vacuum it after wire brushing the walls clean.


A bit of Thermolux 1200 degree high heat paint.

Fireplace Glass used:
Pour in a Starfire base with a splash of Gold and Bronze Rust Copper on top.


.

Then you have one nice fireplace, great job!


 Kenneth: Thank you for all of your support and help. Ed